
I haven’t done much Lunar or planetary really. But when Dark Clear Skies gave a planetary camera to use, and I have to say the Player One Mars 662M blew me away. There was something so satisfying about using this camera, and in this review I’m going to delve into the use of this camera and my experience with it.
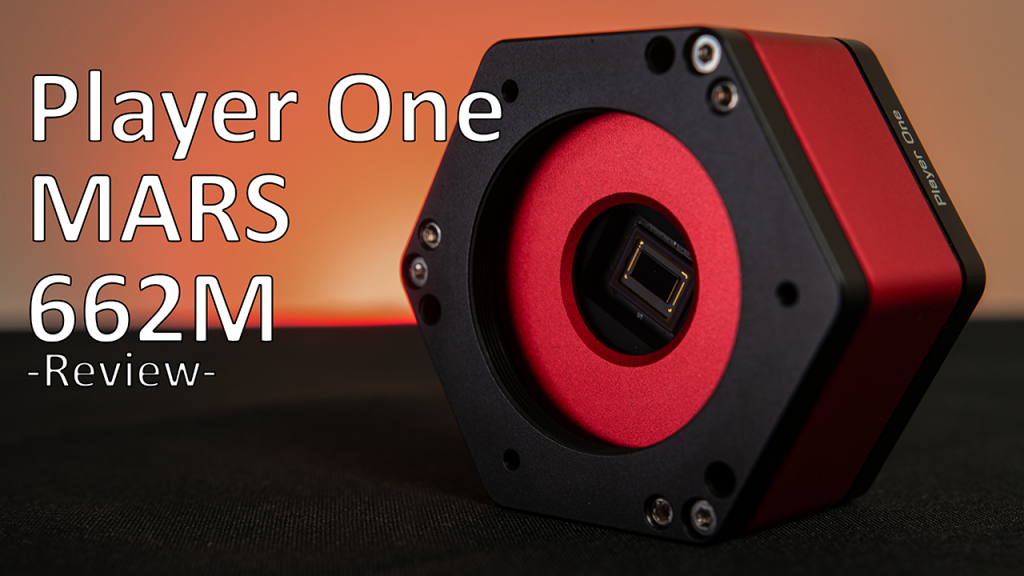
Player One Mars 662M Camera Review
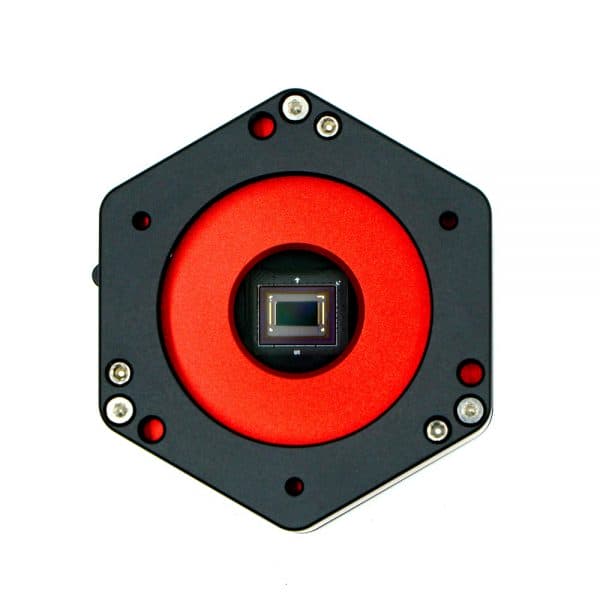
The Player One Mars, in particular mine is the Player One Mars 662M, is a small form factor planetary imaging camera with a tiny sensor. You have the choice between colour or monochromatic variants, but from what I can see there isn’t an option for any with active cooling. Which makes sense as the Player One Mars 662M was designed as either a guide camera or a planetary imaging camera.
The camera itself has a nice small, compact form factor. The build quality is great; nicely anodised metal body that is bolted securely together. Honestly it feels like you could drop this down several flights of stone steps and it would be fine. Though I wouldn’t suggest doing that yourself.
On the back face there is a 1/4″ (6.35mm) threaded insert enabling the Player One Mars 662M to be used as an all-sky camera if that’s what you’d like to do. On the right hand side of its hexagonal body there is an ST4 Port for use as a guide camera, and the USB3.0 type B port for connection to a laptop.
What’s In The Box
The box is a compact thing that’s really efficiently packed. I really appreciate how it looks like they’ve took their time to design the box and not just have a half lid like most do. It slides out of the outer sleeve. To me it added a sense of occasion, for some reason just having a sleeved box made it feel like a much more premium product. Within the box you’ll find everything you need to use the camera:
- The Camera and T-Mount
- USB3.0 Cable
- ST4 Guiding Cable
- M2 Hexagonal Allen Key
- 1.25″ Cover
- A Small Dust Blower
The fact this small camera came with a small dust blower really pleased me. Like finding a small bottle of shampoo when you go into a hotel. It was just a pleasing addition that I wasn’t expecting and again reinforced the first impressions that the Player One Mars 662M camera was a nice product.
Player One Mars 662M Sensor Window
The sensor’s window fitted to the Player One Mars 662M is 19mm in diameter to cover the tiny sensor. It doesn’t have any window heating on it for dew prevention. Though it is a very transmissible window, with little to no blocking on it.
The chart published by Player One shows a high transmission rating of almost 100% from 310nm to 1100nm. This means it’s extremely sensitive to Ultraviolet wavelengths as well as infrared wavelengths of light. This is beneficial to some planets, such as Venus, where you want more UV tranmission, or Jupiter where you may want to use an IR filter to stablise seeing conditions.
Though, as I found out, if you want to use this camera as a deep sky photography camera then you’ll need to add in your own UV/IR cut filter to control the stars, or else they’ll be extremely bloated. For use as a guide camera you won’t have any issues. Sometimes a slightly larger star (bloated) may be beneficial for your guiding software to lock onto it.
It has what they’re calling “Super AR”. So super Anti-reflective coatings on it. In theory this will help increase contrast by rejecting reflections, as well as resist halos appearing as any light that isn’t entering the glass at the right angle will be rejected.

Player One Mars 662M Sensor
So once we get past the external build quality and the window, it’s time to get to the main event of any camera. The sensor. Nestled 12.5mm back from the glass lies a Sony IMX662 sensor. Again, it comes in two flavours: colour or mono. The Sony IMX662 sensor is small, but very capable. Boasting access to quite some numbers. Firstly let’s talk about it’s physical size though as I keep saying how small it is.

So once we get past the external build quality and the window, it’s time to get to the main event of any camera. The sensor. Nestled 12.5mm back from the glass lies a Sony IMX662 sensor. Again, it comes in two flavours: colour or mono. The Sony IMX662 sensor is small, but very capable. Boasting access to quite some numbers. Firstly let’s talk about it’s physical size though as I keep saying how small it is.
The IMX662 sensor comes in with a 5.6mm x 3.2mm effective area sensor, giving it a diagonal of 6.4mm or 1/2.8″ format. Which means this camera has a whopping crop factor of 6.75x. If you want to know all about the effect of crop factors in astrophotography then I wrote a whole article about it.
In the picture, the grey square is a full frame sensor. The red square is how big the IMX662 sensor is in relation to it. It’s easy to see why we get a 6.75x crop factor when seen like this.
The Player One Mars 662M also comes with Sony’s new Starvis 2 technology. This is a back-illuminated CMOS sensor. Back illumination means this sensor won’t suffer from amp glow, which plagued earlier CMOS cameras when I was getting into the hobby in 2018 and earlier. Though back-illumination isn’t anything new these days, it’s nice that it’s featured, and users of the Player One Mars won’t have to worry about amplifier glow.
Dotted around the main body and face of the camera you can also use the M2 Allen key that’s included to adjust the tilt. This attempts to square the sensor off to the light path. In such a small sensor I can’t see this being too much of an issue but it’s always a possibility. So it’s really good that they included the ability to adjust tilt just in case.
In my time with the camera I never had any issues with tilt. It seems to have been setup perfectly from the factory. It isn’t like I got a special reviewers sample or anything like that either. The owner of Dark Clear Skies literally grabbed a random box from his stand at the International Astronomy Show and said “here you go”. So the camera I got is going to be the same as what you’ll get.
Using The Player One Mars 662M
Once I had everything unboxed and analysed it was quite simple to use. I did notice my laptop didn’t automatically install the camera, which means none of my programs like SharpCap or Astrophotography Tool was able to detect it. This was solved quite easily by going to the Player One Astronomy website and downloading the drivers.
It is worth mentioning in case you’re wondering: no. The Player One Mars will not work with a ZWO ASIAir. In fact, Player One Astronomy was founded by ex ZWO employees, so there’s a bit of a conflict of interest there. However, there would be nothing stopping you from installing the drivers onto a ToupTek Stellavita Smart Astrophotography Wireless Controller and using that to control the Player One Mars.
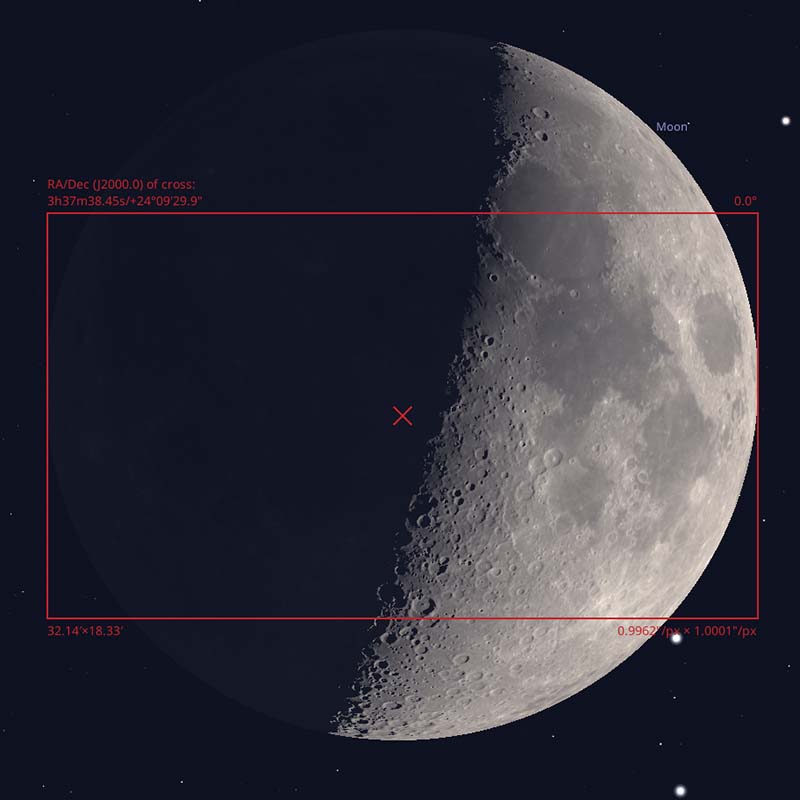
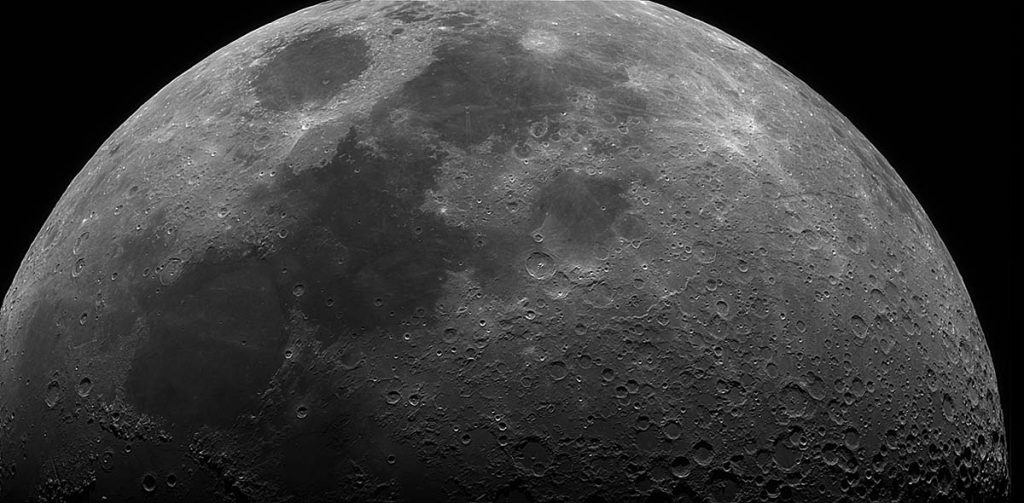
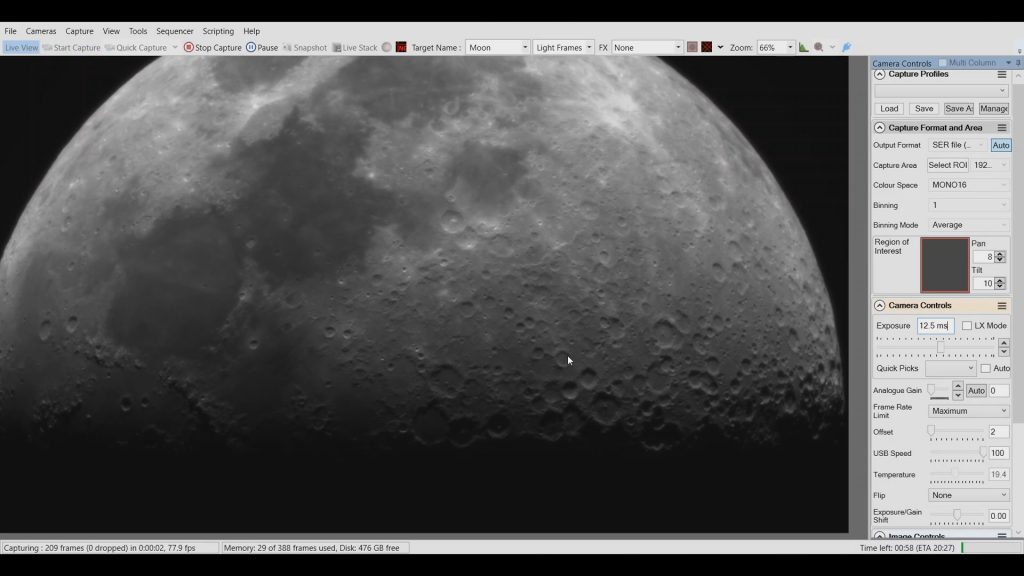
Really once it was installed and everything was updated, this camera was super easy to use. The only thing that really made it tricky is the tight field of view because of that crop factor. In fact, depending on the Moon’s and its distance from Earth, I can barely fit the diameter of the Moon with my Sky-Watcher 80ED at its native 600mm focal length. Achieving a field of view that’s 32′ 8.4″ x 18′ 19.8″

Frames Per Second Of The Player One Mars 662M
When using a camera for planetary, Lunar or Solar work quite often it’s better to take a video. That’s why you often see cameras designed for this boasting about their frames per second as their best characteristic. For the Player One Mars 66M2, it’s boasted that it can get 108 frames per second. Now usually this number is not that accurate. In my experience a lot of the time this is the max frame rate you’ll get using a small region of interest with Mono 8 or something restrictive like that. That’s due to the data transfer and on-board memory of the camera. The Player One Mars 662M has 256mb of DDR3 onboard memory and individual frames aren’t that chunky.
The camera is 1920×1080 and mono, so the framerate can stay quite keen. In my use, I did manage to hit 100fps at 800×600 region of interest and Mono 16. But when I used the camera at its full resolution and Mono 16 I still was getting 77.6fps which is fantastic. The only time I saw this number drop considerably was after about 1000 frames captured. I suspect I was beginning to fill the onboard memory buffer faster than it could write so it slowed the fps capture down.
Either way, 77.6 frames per second at full resolution is impressive and I felt this was pretty good. It’s certainly not a million miles away from its boasted total, at about 72% of its theoretical maximum. Again, remember dropping down to Mono8 and using region of interest, as well as smaller video stacks will help you hit the maximum frame rates possible. So I was definitely impressed by the operation and use of this camera.
Using The Player One Mars 662M On A Nebula
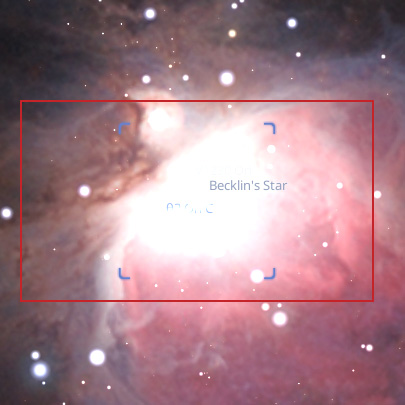
So it’s been established this is actually a planetary camera, but I just couldn’t resist the urge to see how this performs on a deep sky target. As eluded to earlier, it doesn’t have a filter on it really. So I had to put an Optolong L-Pro 1.25″ filter on it to cut that extreme UV and IR off. However, I slewed over to M42 the Great Orion Nebula within the constellation of Orion where I hit the first problem:
Plate solving and finding a target with this tight field of view is hard! Even though I have the Go-To++ and plate solve libraries installed, it still took a while to plate solve and find the target. Usually, with planetary, this isn’t a problem as you’d use a finder scope or something. But apparently I chose the way of pain.
As you can see from the picture – the field of view is so tight. This can be great in some ways as you can focus tight on certain details, but it can be difficult to find targets and focus with such a narrow field of view.
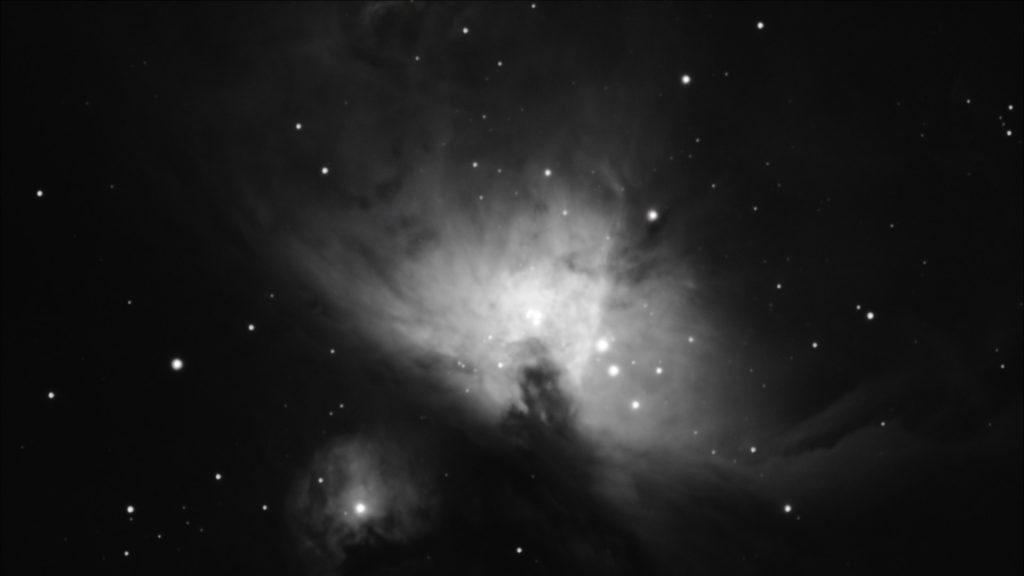
I have to stress again that this is not the main use of this camera at all. But it’s a camera, and I’m testing it. So with that in mind, I made an imaging plan in Astrophotography Tool and got to work.
Ultimately I took 30 photos of 30 seconds each, totalling a stack of 15 minutes. I don’t have any colour filters for this camera, so it is a greyscale photo in the end which I don’t mind. I think they have their own unique charm. The camera sensor was running at 13°c and I used the usual calibration suite of darks, flats and bias etc. To be fair, the haphazard nature of my capturing, I’m pretty pleased with how this camera faired! I was running at 100 gain, which is unity for this camera.
Player One Mars 662M Sensor Specs
I had a great time using the camera and doing some planets and Lunar work with it. I feel the 662 sensor is a very capable sensor and definitely has a lot to give. If we look at the published charts from Player One as well we can really delve into the potential of this camera.
Key Points
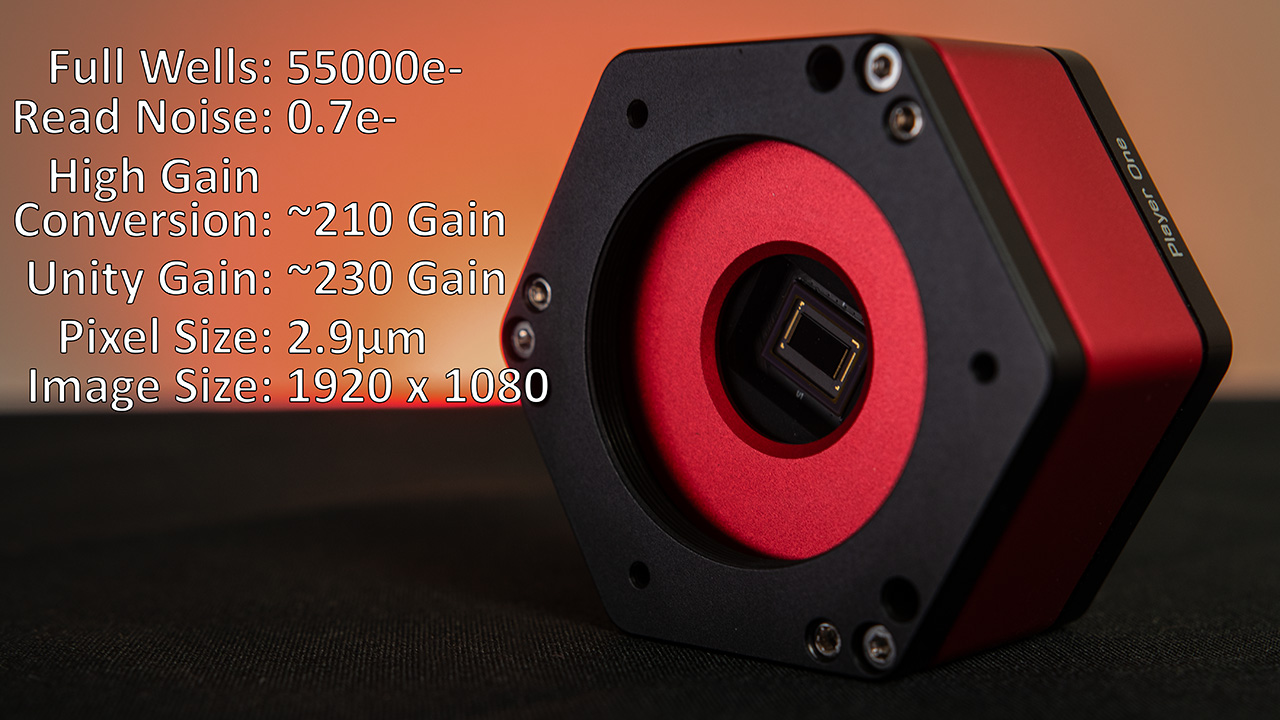
- 54000e- Full Wells
- 0.7e Read Noise
- 2.9µm pixel size
- 1920 x 1080 pixel resolution
- 5.6mm x 3.1mm sensor size
- Dead Pixel Suppression Technology
- ~91% Quantum Efficiency
- High Gain Conversion
Player One Mars 662M Full Well Depth
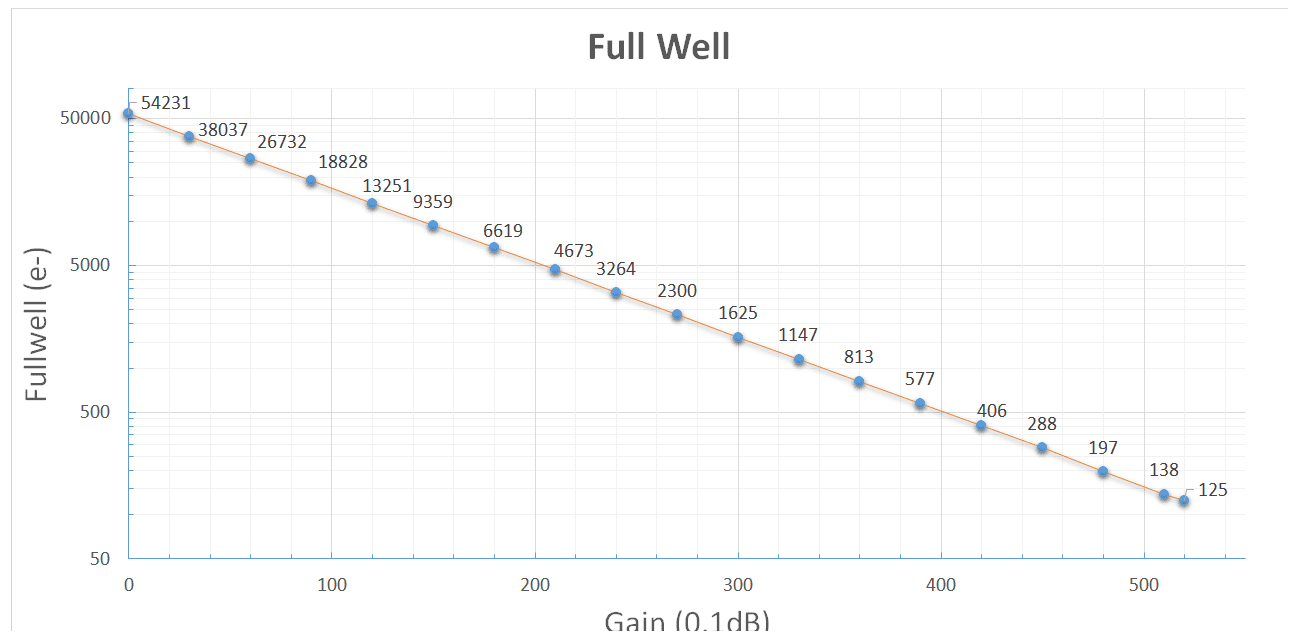
This camera boasts a whopping 54000 electrons of full wells. In simple terms, that’s decides on how much light a pixel can take before it saturates to white.
Looking at the chart though, you need to work at low gains to take advantage of these. Which means you’ll have more read noise. This can be overcome with longer exposures. However with this being a planetary camera, chances are you’ll be working higher on the gain chart so your wells will be shallower. This won’t present a problem if you’re using it as intended – as in for planets, the Moon or the Sun.
Player One Mars 662M Read Noise

Whilst the Player One official material boasts the read noise of being a really low 0.7e, it’s something you always have to be careful of. To be fair, it’s not unique to Player One. Every manufacturer does this.
The stated 0.7e wells are at the highest gains this camera can go to. That means you’ll have the most shallow wells, and lowest dynamic range also. But, in the case of a planetary camera like the Player One Mars 662M, that isn’t too big of an issue as you’ll be taking videos usually and getting lots of frames to reduce any noise.
Player One Mars 662M Dynamic Range
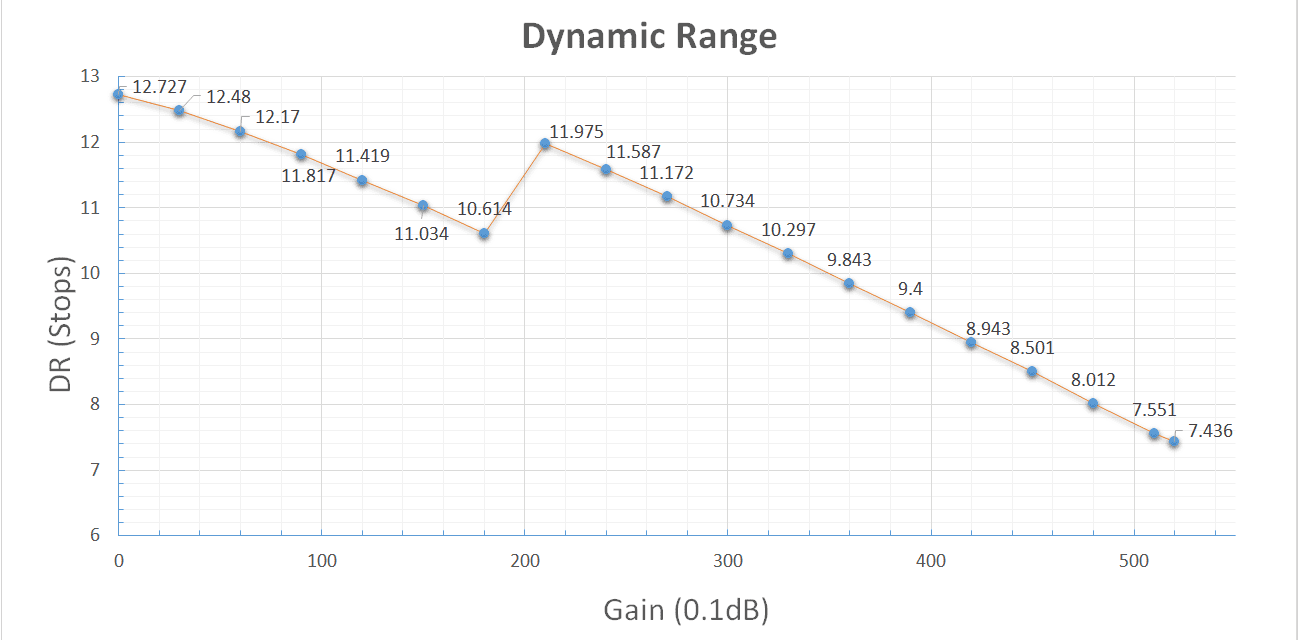
Speaking of dynamic range, the camera does have a nice 12.7 stops of dynamic range. So that’s a fancy way of saying how much data it can capture between the darkest and brightest regions of the photo. However again you need to be at the lowest gain settings.
Once more though, 7.4 stops down at the highest regions where you may be using this isn’t bad either. Really, the best thing to do is change the gain about and have a play around. It’s quick to do and won’t break anything after all.
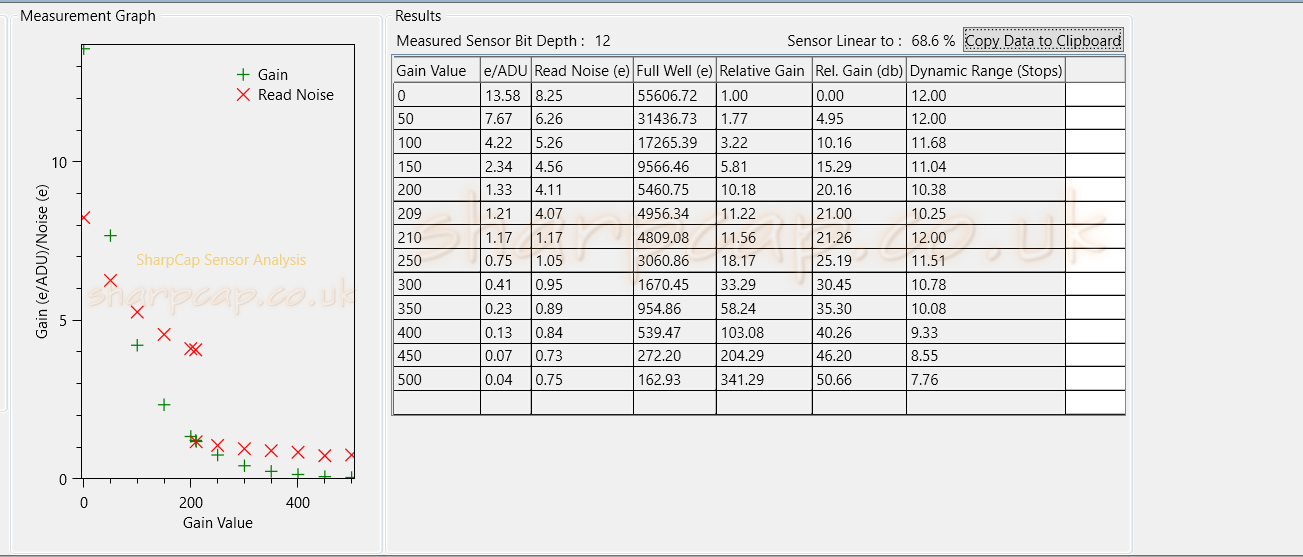
Player One Mars 662M Sensor Analysis
So one great thing that the program SharpCap has is the Sensor Analysis function. It’s something you can use on the free license. But SharpCap is so useful and relatively cheap, just go ahead and buy a pro license and support Robin. He’s a sound guy. Either way, I ran my Player One Mars 662M through SharpCap’s sensor analysis and really it’s very comparable to what Player One has published.
So one great thing that the program SharpCap has is the Sensor Analysis function. It’s something you can use on the free license. But SharpCap is so useful and relatively cheap, just go ahead and buy a pro license and support Robin. He’s a sound guy. Either way, I ran my Player One Mars 662M through SharpCap’s sensor analysis and really it’s very comparable to what Player One has published.
Player One Mars 662M Conclusion
So after using this camera I have to say I really enjoyed it. It’s opened a new world up for me of planetary imaging or improving my Lunar photography. I’ve felt that it’s extremely capable, I love the form factor and the appearance of it and the fact it comes with a mini air blower just feels nice.
The pricing, at the time of this review, is quite keen as well. You can pick up the Player One Mars 662C Colour Planetary Camera for £199 from Dark Clear Skies, or if you want the one I used, it’s the Player One Mars 662M Mono Planetary Camera and that is priced at £285 from Dark Clear Skies. Let them know I sent you!
There are some downsides, namely the tiny chip. It’s a blessing but has its learning curve. The tiny field of view can make finding targets challenging. I was using it at 600mm, but you may be using it at much longer focal lengths or with Barlow lenses. Which means the field of view shrinks even more. You’ll be amazed at how hard it can be to find a full Moon with a tiny field of view. So be sure your finder scope is well collimated to your primary imaging scope. Or else you’re in for a world of hurt!
As always, the camera specs they boast about are the very best you’re going to get. The deep wells are at the low end of the gain, but the low read noise you want for video work is at the high gain side. But for planetary work, you’ll be using high gain anyway for that reduced read noise. The High Gain Conversion will help you keep your dynamic range.
The fact this camera kept up a high frame right even at native resolution was impressive for sure. Now just be aware if you buy the colour version you’ll definitely have reduced frame rates as the processing it takes to work out the colour image slows things down. If you want the highest FPS, get the mono version.
The joy, the capability and the fun I had using this Player One Mars 662M with the Sony IMX662M sensor in it was great. It really made me seriously consider and look into buying planetary telescopes. So I can get better images of the planets and of the Moon and even get into solar. I would need to introduce coloured filters though.
I feel the pricing is good, you’re getting the choice of a guide scope and an imaging scope. If you decide to do DSO, pop the Player One Mars 662M into your guide scope and when you want to do solar system work, swap the camera out. I think when you look at it that way, you have two cameras for the price of one. Which arguably makes the pricing even better.
Get the drivers downloaded, point to the Moon and have fun taking some photos. Well… videos, but you get what I mean.
I hope this review has been useful for you, clear skies everyone. Keep looking up and keep those cameras clicking.
Player One Mars 662M Video Review
If you’d rather watch me using the Player one Mars 662M and the review, then you can find my video on YouTube below!