Astrophotography Sensor Crop Factors
Understanding The Effect Of Crop Factors In Astrophotography Is A Critical Skill That Will Help You Unlock The Full Potential Of Your Telescope And Camera. If you know about photography and camera sensors, then you’ve undoubtedly heard of crop factor. However, did you know that it will apply to astrophotography? In this article, I’m going to tell you all about the effect of crop factors in astrophotography, sensor crop factors, how to calculate it, what affect it will have on your field of view AND give you a handy table to review easily.
When I made The Night Sky series, a huge thing I did was including different sensor sizes and what crop factor to expect. I felt this was a good choice for those in astrophotography so you would be able to pick optics that would give you the same field of view even if you had a different sensor.
Astrophotography sensor crop factors come in all different shapes and sizes. We have lots of sensor sizes in astrophotography. From tiny sensors used primarily for guide cameras or planetary cameras. To huge medium format sensors used in specialist (and very expensive) cameras, and everything in between. The famous 2600 sensor, the reliable 183 sensor, the faithful 533 sensor. They all come in different shapes and sizes. So when you’re looking for astrophotography sensor crop factors, there is some maths involved.
Let’s delve in to the effect of crop factors in astrophotography!
Contents In This Article
- What Is Crop Factor?
- How To Calculate Crop Factor
- How Does Crop Factor Affect Focal Length?
- What Is Astrophotography Field Of View?
- How Does Astrophotography Sensor Crop Factor Affect Field Of View?
- Digital Crop vs Sensor Crop
- The Effect Of Crop Factors In Astrophotography Conclusion
- Astrophotography Sensor Crop Factors Table
- Astrophotography Crop Factor Calculator
What Is Crop Factor?
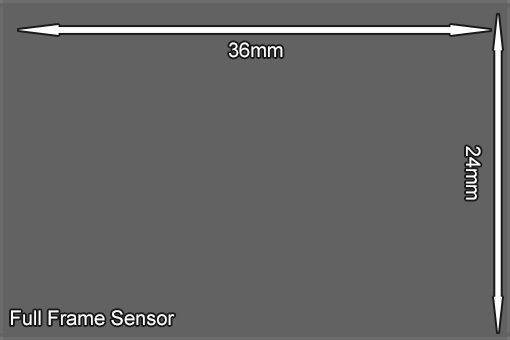
Crop factor in any form of photography from terrestrial to astrophotography, even to microscopy, is essentially how many times bigger, or smaller, a sensor is when compared to a full frame sensor. Way back in the days of film photography, the most common size of film back then was 36mm x 24mm. This gave an aspect ratio of 3:2. The long side of a full frame is 36mm wide, and its height is 24mm.
Translating this to modern cameras, it’s how many pixels we can fit on a sensor the same size. The amount of pixels that could fit on a full frame sensor would vary depending on the pixel size. That’s where the term megapixel would come from. How many thousands of pixels can fit on this sensor.
However, full frame camera sensors were pricy. So in 1996 the film camera industry was introduced to the camera sensor size known as APS-C. Or Advanced Photo System – Type C. This was a smaller sensor, which made it a bit more affordable. Though the format didn’t live long in film cameras, it got picked up in DSLRs (Digital Single Lens Reflux) very quicky. This is due to its smaller size making manufacturing cheaper, and therefore the hobbyist and prosumer markets could afford the camera bodies more readily.
However, with the APS-C sensor size being smaller (actual sizes vary by manufacturer), an APS-C Sensor wouldn’t ‘see’ as much as a full frame sensor would. In fact, the image coming through the camera’s lens would appear cropped. This is where the term crop factor comes in. Which applies to all camera sensors you may use in the camera you use for Earthly photography. As well as astrophotography sensor crop factors.

How To Calculate Crop Factor
Now we’ve established what Crop Factor is, did you know you can actually calculate this? It’s actually relatively easy as well. By seeing how many times your smaller sensor fits into a full frame, you can calculate the sensor’s crop factor. This can be applied to your DSLR or Mirrorless camera you use day-to-day, the camera in your phone and your astrophotography sensor’s crop factor.
So let’s take the Full Frame to APS-C Sensor comparison. It’s a pretty typical comparison that’s cited a lot. As established, a full frame sensor is 36mm by 24mm and is the bench mark. It would have a crop factor of 1x as it is the standard we’re comparing against. This is a photography wide standard that crop factor is measured against. So it’s a safe and robust metric.
The APS-C Sensor has a sensor that is 23.5mm wide, and 15.7mm tall. How to calculate crop factor? First we need the diagonal measurement of our full frame sensor, and we need the diagonal measurement of our APS-C Sensor. Measuring along the long edge will work, but you would get two different crop factors for width and height. By measuring along the diagonal, we get the true size difference.
So our Full Frame camera has a diagonal of 43.3mm, and our APS-C Camera has a diagonal of 28.3mm. If we divide 43.3mm by 28.3mm we get 1.53x. Or, to say it another way:
“The full frame sensor is 1.53 times larger than the APS-C Sensor”
So let’s take an extreme example. The famous Sony IMX 294 sensor that was used a lot by the astrophotography community is approx 19.19mm wide and 13.07mm tall with a diagonal of 23.2mm . Can you calculate the crop factor?
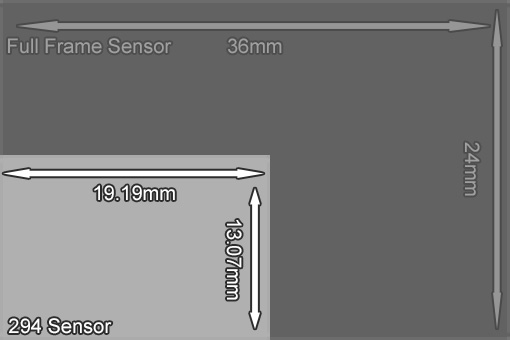
So remember to calculate the crop factor, we’re going to divide the 23.2mm diagonal of the 294 sensor into the 43.3mm diagonal of the full frame sensor. That should give us a crop factor of about 1.87x. Or:
“The full frame sensor is 1.87 times larger than the 294 Sensor”
How Does Crop Factor Affect Focal Length?
So we’ve learnt what Crop Factor is. Big deal. How does this actually affect your focal length?
We’ve established that a crop factor means the smaller sensor will in essence ‘see’ less than its full frame counter part. That’s physics. It’s physically smaller, it has less surface area to capture light, and it cannot use the whole lens’ diameter to capture light. Look at this graphic to help:
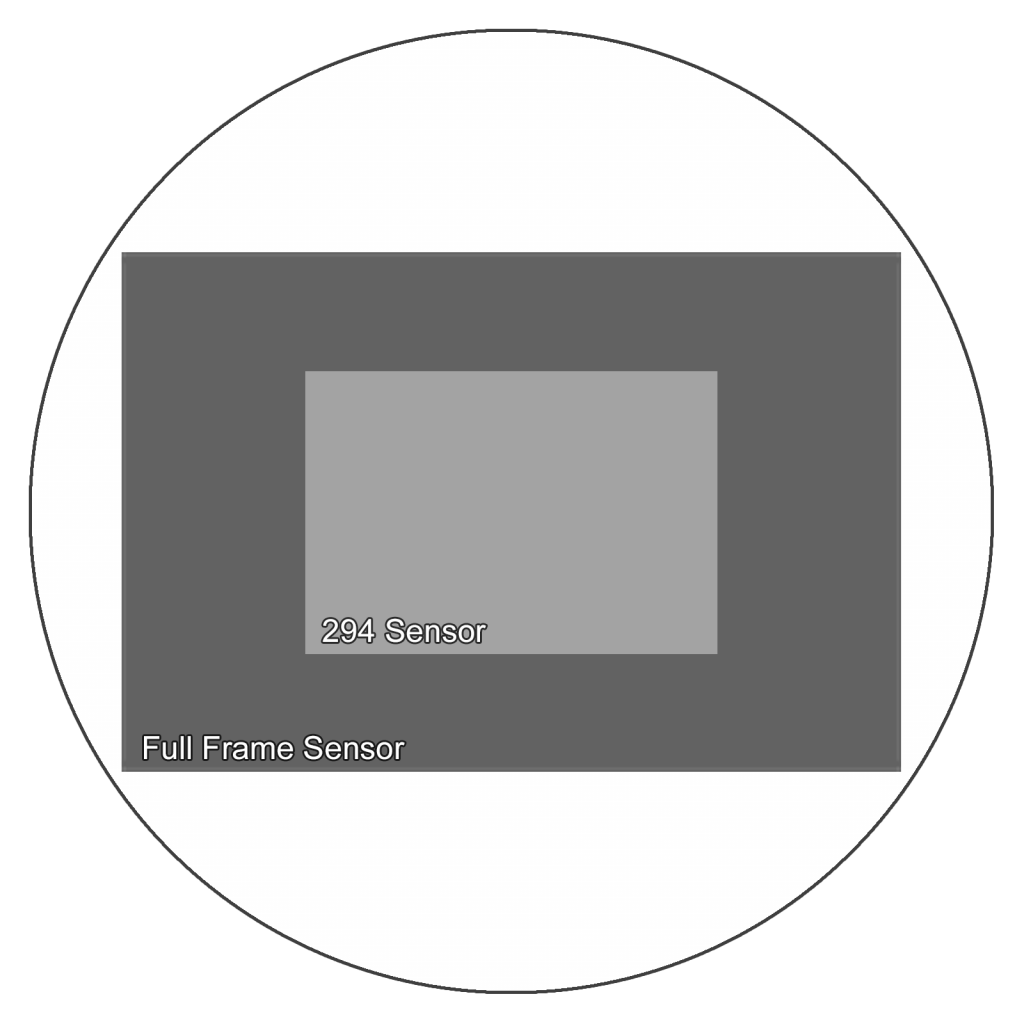
Here I’ve illustrated an example of an imaging circle. That’s what the camera lens, or telescope, is projecting. Once we’ve focused and composed on our target, our light image fills this imaging circle.
The Full Frame Sensor is so much larger, that it can stretch to cover almost the entire imaging circle. Because it fits so nicely in we have no vignetting. That is, darkening of corners as there’s no light on it. We’re “filling the frame” of the imaging circle with a big sensor.
Now look at the comparatively smaller 294 sensor. You can see how much less of the imaging circle it’s covering. So it makes sense how the 294 sensor will never see an image as big as the full frame sensor.
The picture taken on the 294 might look practically identical if you took the full frame’s photo and cropped it down 1.87 times.
So how does this affect your focal length? The crop factor has an affect of multiplying your focal length by the crop factor. This means your field of view – what your camera actually can see – gets smaller. All the light is funnelled onto a smaller imaging chip. Again with the example above, this means the 294 would look like it’s working at a longer (or bigger) focal length.
If I was to image a target at 1000 millimetre focal length with a full frame sensor like the 6200 sensor. Then it’s easy: my crop factor is 1x, so my focal length is a true 1000mm.
However, if I was to attach a 294 sensor to that same 1000mm focal length telescope, then it gets funky. We’ve already established the Sony IMX294 sensor is 1.87x smaller than the full frame. So it has a 1.87 crop factor. So the apparent focal length I’m now imaging with is:
Focal Length = Crop Factor x Focal Length
Focal Length = 1.87 x 1000
Focal Length = 1870mm
So because now my telescope is operating at an apparent 1870mm focal length, it will see a lot less. The field of view shrinks and becomes rather tiny. This will have an enormous affect on your telescope and how you use it. It can either be used to your benefit, or it can be a hinderance. When I bought my first dedicated astronomy camera, the Altair Astro Hypercam 183c, I wasn’t aware that the 183 sensor was so much smaller than my DSLR. So I was incredibly shocked, and a bit miffed, by how tiny my field of view had become. My telescope handled completely differently.

- Apparent Focal Length: Focal length after crop factor is applied
- Crop Factor: How many times bigger or smaller the sensor is when compared to full frame
- Telescope Focal Length: What your telescope is working at after any barlows or reducers
You will need at least two factors to use this triangle. More often than not these will be your telescope’s focal length and your camera’s crop factor.
Cover the one you’re looking for. In this example we want to know the apparent focal length. So we’ll cover it.
Now we can see the sum we have to do is Crop Factor x Telescope Focal Length
This can work backwards as well. If I know my apparent focal length and my telescope’s focal length, I cover Crop Factor. This tells me I need to divide my Apparent Focal Length by Telescope Focal length 1500 ÷ 1000 = 1.5x
So what is the effect of crop factors in astrophotography and how does astrophotography sensor crop factor affect our field of view in detail? Let’s have a look.
What Is Astrophotography Field Of View?
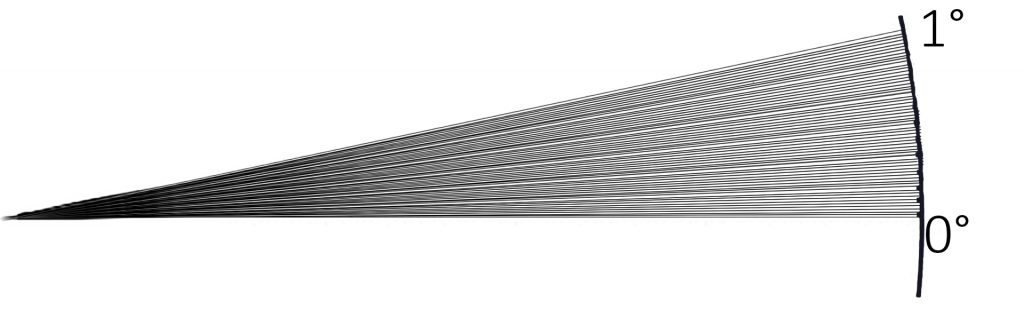
Within astrophotography, the term Field Of View is given to what the camera and telescope/lens combination is going to see. It really is no different to how it would perform when taking photos of things on Earth. However, we split the night sky into a huge sphere, that is then broken down into degrees, then further into minutes, and finally into seconds of arc. Just picture a circle, and split it 360 times.
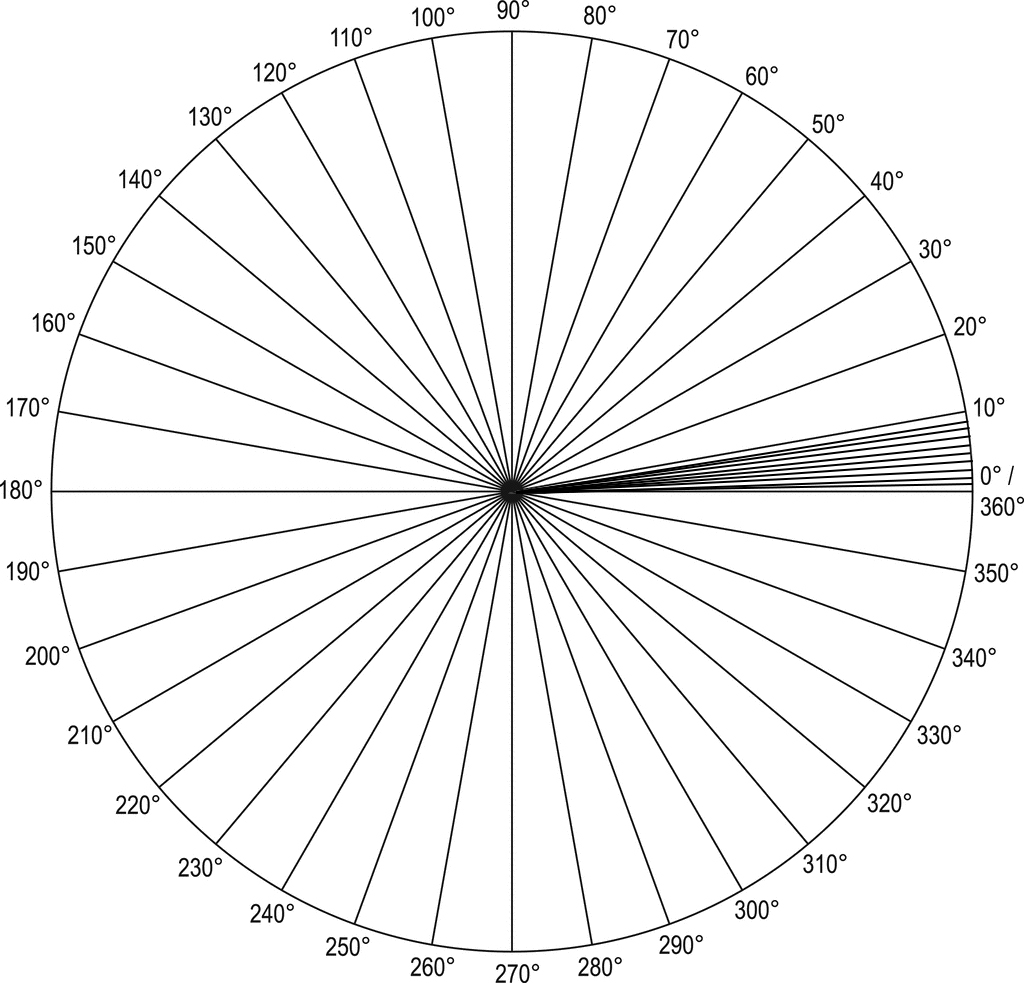
As we can see from the above image, I’ve split cut the above circle into multiple segments that are 10° apart. This can really easily portray the night sky above us. At the far right, between 0° and 10°, it’s been cut up further into 10 smaller segments that are 1° each. Each of those 1° segments is 1° of arc in the night sky. For reference, the full Moon has the apparent size of half of one arc degree. Or 1/2°, otherwise summed up as 30′ (minutes).
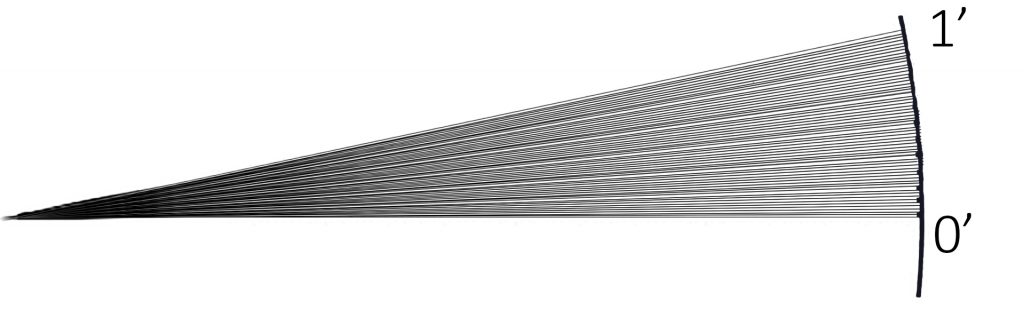
Arc-Minutes And Arc-Seconds
An Arc-Minute is the next smaller unit down we can talk about. There are 60 minutes of arc to an arc degree. Or, an arc-minute is 1/60th of one degree. Whichever works for you.
When we discuss astrophotography fields of view, it is usually written as arc degrees and arc minutes. Such as 3°25.06 x 2°16.92′. This will be 3 degrees and 25 minutes wide. 2 degrees, 16 minutes tall. As field of views are four sided, we need a width and height measurement. Typically, this is the smallest we’d break field of view down. Unless you’re using some super long telescopes and small sensors really. Then you may need to know about Arc Seconds. This has already been denoted in the decimal such as 25.06′. So 25 minutes, and 06 seconds of arc.
An arc second is the smallest unit you’ll see. Sometimes you’ll see a deep sky object listed with its seconds to show how tiny it is. Fun fact! If you know the apparent size of a target you’re wanting to photograph, and you know your camera/telescope field of view, you’ll know if you can fit in your target and roughly how big it’ll be in your frame!
Arc seconds are 1/60th of a minute. But they’re base 60, just like our standard clock (it’s literally no different to seconds and minutes of time). But it gets complicated when you’re dealing with base-60 and base 10 that metric uses.
If you see a measurement like this 10.5′ then you’re dealing with seconds. But 0.5 is base 10. You need to find out what 0.5 of 60 is, which is 30. So 10.5′ is actually 10 minutes and 30 seconds of arc.
If you just want me to tell you, then 1 second of arc = 0.0166667 minutes of arc. Multiply the 0.0166667 by how your decimal number to find out your seconds. So let’s go back to the above example:
- 3°25.06′ is 3 degrees of arc, 25 minutes and 3.6 arc seconds. (Don’t even bother going into milliseconds of arc…)
- 2°16.95 is 2 degrees of arc, 16 minutes of arc and 55.2 arc seconds
Look, I’ll level with you. Don’t stress arc seconds too much, or at all. Unless you’re wanting to get into astrophysics. For our purposes, arc degrees and arc-minutes is all we really need to work out our astrophotography field of view.
How Does Astrophotography Sensor Crop Factor Affect Field Of View?
Let’s look at a more practical example then. In this, let’s assume this photo of M31 – The Andromeda Galaxy was taken with a full frame sensor. Here we can see the effect of crop factors in astrophotography and how sensor crop factors influence what you would see. This is assuming the telescope remains the same and the only thing that has been changed is the sensor size.
- Whole image is a Full Frame Sensor
- Red is what the APS-C Sensor (such as a 2600) would see
- Green is what the 294 sensor would see
- White is what the 183 sensor would pick up
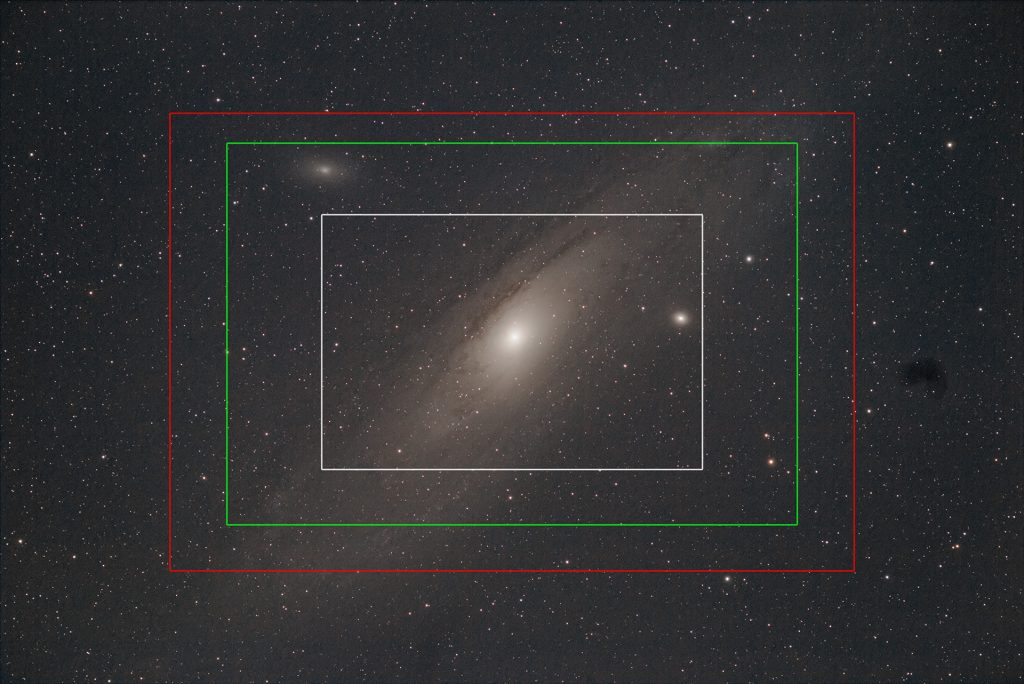
- Whole FOV: 3°25.06 x 2°16.92′ (3 degrees, 25 minutes and 2.6 seconds x 2 degrees, 16 minutes and 55.2 seconds)
- Red FOV: 2°14.57′ x 1°29.95′ (2 degrees, 14 minutes and 34.2 seconds x 1 degree, 29 minutes and 57 seconds)
- Green FOV: 1°49.94′ x 1°14.88′ (1 degree, 49 minutes and 56.4 seconds x 1 degree, 14 minutes and 52.8 seconds)
- White FOV: 1°15.63′ x 0°50.42′ (1 degree, 15 minutes and 37.8 seconds x 0 degrees, 50 minutes and 25.2 seconds)
So we can see the importance of choosing the correct sensor size for your telescope. I definitely made this mistake when I first started and bought the 183 sensor camera. I was then super surprised at how small my field of view was and it caught me off guard.
This therefore has a direct, and substantial, affect on the field of view your telescope will give you. When you’re choosing a new camera, it really will benefit you to understand the relationship between crop factor and your telescope’s focal length. It may even influence whether you could do with a new camera, or perhaps you would benefit from a different telescope instead.
The crop factor of your camera, and therefore its apparent field of view, can be used in either direction. If you want to work out what a full frame camera would be like using a longer telescope, or if you want to match a smaller chip to a familiar field of view.
Let’s look at these two examples here from the brilliant free software Stellarium, and how we can calculate it.
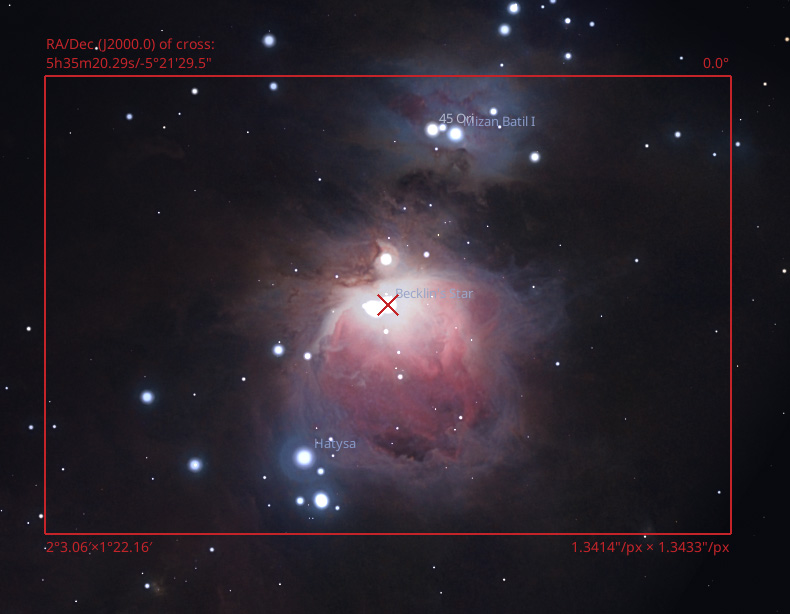
Comparison To Full Frame Camera
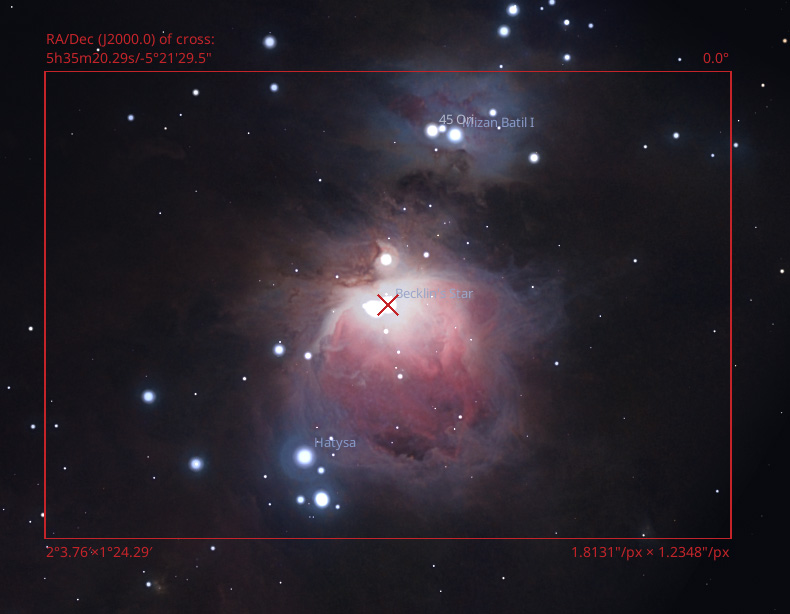
Here we have M42, the Great Orion Nebula in the constellation of Orion. A very famous target, often photographed.
In this example, I’ve got a 1000mm focal length telescope. Aperture isn’t important right now.
I’ve matched that 1000mm telescope to a full frame camera. So my crop factor and apparent focal length is
1000mm x 1.0 = 1000mm
And as we can see, it gives us a field of view of 2°3.06′ by 1°22.16′
However, if I was using a camera with the 294 camera in and I want to replicate this exact field of view, I can just reverse the equation.
How To Calculate What Length Telescope You Need
So in order to match this exact same field of view, don’t forget the calculation and triangle from earlier.

We know our apparent focal length we’re aiming for is 1000mm, and we know the crop factor of the 294 sensor is 1.87x. So by covering “Telescope Focal Length” it tells us that we have to divide Apparent Focal Length (1000mm) by Crop Factor (1.87x)
1000 / 1.87x = 533mm
So does this mean if we pair a 294 sensor with a telescope that’s 533mm in focal length, we’ll match the field of view? Well let’s check it in Stellarium.
By doing our calculation we can see then using a 533mm telescope with a 294 sensor camera we’ve effectively replicated the field of view from a 1000mm telescope with a full frame.
That’s because 533 * 1.87 = 996mm ish. The 294’s crop factor is actually 1.8663793103448275862068965517241… but that’s an awfully big number. So rounding it to 1.87 will do the job.
If the visual similarity isn’t enough, look at the field of view in the bottom corner:
2°3.76 by 1°24.29′ – that’s incredibly similar to the field of view above with the full frame camera. It’s close enough to where you won’t notice it.
Digital Crop vs Sensor Crop
So now we’ve explored a lot about crop factor, what it is, the effect it has on field of view and how to calculate it. The question is then why bother when you can just crop in post-processing with astrophotography?
This is very true. You could just crop down to the size you’re after. This would be referred to as a digital crop. It’s no different to how film photographers would literally cut their prints down to size. In fact if you look at the icon for crop, it looks an awful lot like right angle rulers you’d use to cut a photo. Funny that…
An advantage of using a digital crop is clear: you can adjust to any size you want. So if you want to print sometime, you can crop it to 8×4, 10×8 etc etc. Which is fantastic. Or you can crop down to really highlight the one thing you want to show off in your photo.
Compare the following two photos of the Bubble Nebula I took with the ZWO ASI 183mm-Pro that has the 183 sensor in it. The 183 has a pixel resolution of 5496*3672 and a whopping 20.18 megapixels. So there’s no shortage of pixels to play with. Right?
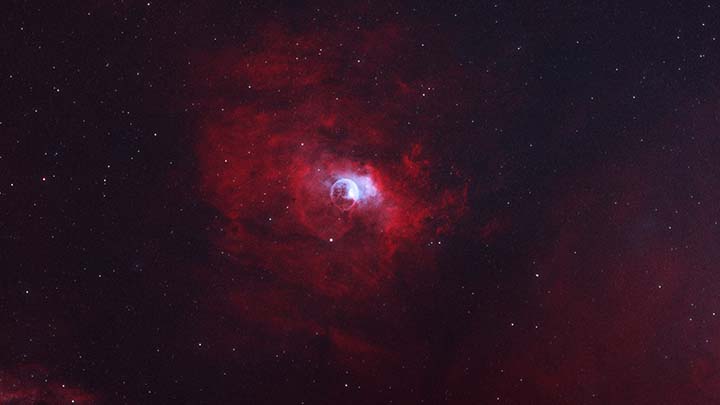
The full size Bubble Nebula image has a pixel count of 4971 pixels by 2796 pixels. I’ve cropped the edges and turned it into a 16×9 aspect ratio.
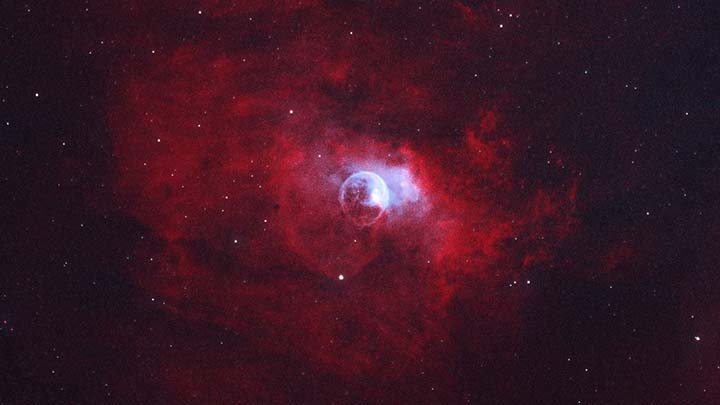
The digitally cropped version though, which I cut down even further in Photoshop, only has 2873 pixels by 1616 pixels. Roughly 48% less pixels. Which means the quality does drop off. In fact if you look closely you can see the quality difference between the two. If you cropped even further then you run out of pixels faster and faster.
But if you can master your crop factor and how it affects your optics, you can take a close up photo like the digitally cropped version whilst keeping all 5496 x 3672 pixels. This means you can have a very intense, frame filling photo with lots of quality.
In short: digitally cropping can ruin your picture’s quality. So there are more often than not times you’ll want to leverage crop factor to your advantage!
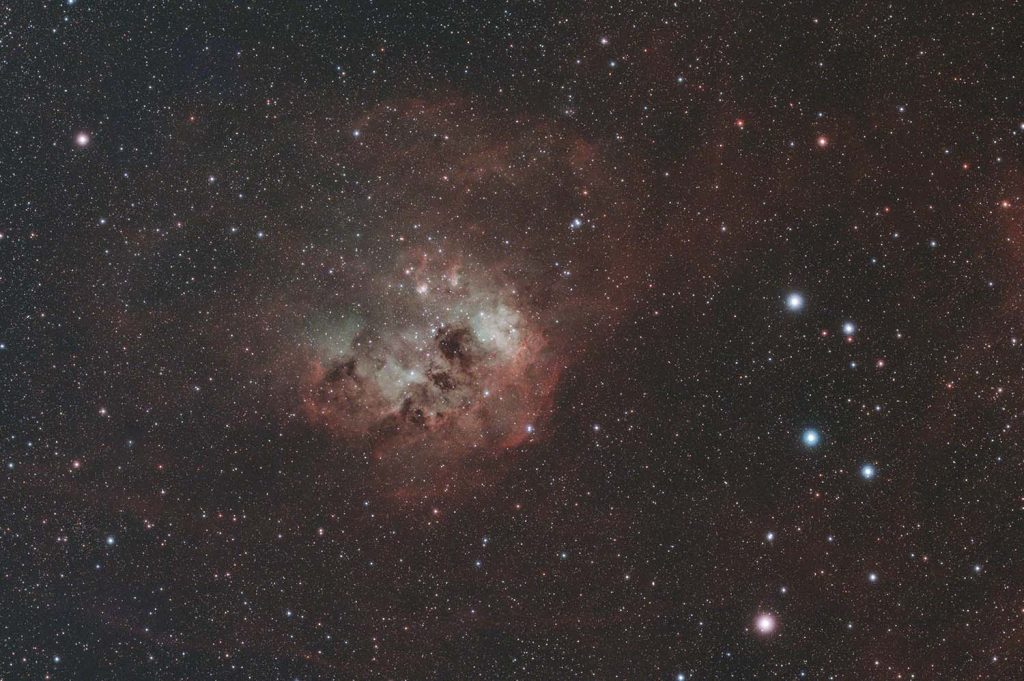
For example I could digitally crop this image of the Tadpole Nebula to get in really tight, but I would lose a lot of quality in the final image, and a lot of pixels. That may not be a bad thing if you’re just sharing online. But if you want to print, then you need all those pixels. Or I could use a camera with a smaller chip – a larger crop factor – to achieve the tight framing I want.
The Effect Of Crop Factors In Astrophotography Conclusion
To surmise then; crop factor is the difference in size between a digital camera’s sensor when compared to a full frame sensor. A Full frame sensor is classified as a sensor that measures 36mm by 24mm. Anything smaller than this will induce a crop factor multiplication. By that I mean a telescope or lens will act as if its got a longer focal length.
The crop factor is the difference between the diagonal sizes of the sensor. A full frame sensor has a diagonal measurement of 43.3mm as reference.
It is entirely possible to have a sensor bigger than full frame. These are called medium format, they’re very rare and extraordinarily expensive in astrophotography. Such as the immensely expensive ZWO ASI 461MM-Pro Medium Format camera. In this case you’d have a crop factor that is 0.78x. It goes the other way. A 1000mm telescope will act like a full frame camera on a telescope that is 780mm. To be fair, if you’re buying one of these cameras, you probably understand crop factor.
You can calculate your crop factor, or the apparent focal length you’ll get, or what focal length you need to use by using this formula triangle.
To get an apparent focal length of 1000mm on a camera that has a 1x crop factor, your telescope’s focal length needs to be 1000mm. You need two values, these will usually be the telescope’s focal length after modification by barlows/reducers and your camera’s crop factor.
Crop Factor will dictate your camera’s field of view of space. The field of view are two numbers measuring width and height. These are expressed in degrees of arc and minutes of arc.
Arc-Degrees are 1/360th of the night sky, and an arc-minute is 1/60th of 1 arc degree. Don’t worry about arc seconds.
If you know your target’s apparent size (in arc-degrees, arc-minutes and arc-seconds) and you know your camera’s field of view, you can calculate if you can fit it in your frame.
There are several times where using crop factor to modify your field of view is better than cropping in your editor. Digitally cropping loses pixels and reduces image quality. Whilst if you can use physics to your advantage to fill the frame, you get better quality and more pixels in your final photo.
That’s really as much as I can think of about astrophotography crop factor. I hope this guide has helped you in why knowing this is super important. Especially if you’re planning on buying a new camera for a pre-existing telescope you may own. As you can drastically change the behaviour of your telescope with a different sensor size.
Astrophotography Sensor Crop Factors Table
What I’m including next is a quick cheat sheet for you. I’ve done the maths on several of the popular sensors out there. Now this isn’t an exhaustive list. Nor am I restricting it to the manufacturer of your camera. Every camera you’ll look up will tell you what sensor it has in it, even if they use a snazzy name. For example:
ZWO ASI2600mc, Player One Posidon, Altair Astro Hypercam 26C, SvBony SC571 or the Explore Scientific 26MP all use the same Sony IMX571 sensor. So therefore I’ll put the crop factor for the IMX571 sensor. My recommendation for you is to go to the store page of the camera you’re interested in and use your browsers find function (Control + F on Windows) and search for IMX, it’ll probably take you to exactly what sensor is fitted.
Another caveat here is I’m only talking about CMOS sensors. CCD sensors are a bit antiquated nowadays. Though I believe I’ve armed you with all the knowledge you need to calculate it yourself. I have faith!
If you have any suggestions to add to this chart, please email me your suggestions and I’ll add them to the list!
| Sensor Name | Crop Factor |
| Sony IMX461 | 0.78x |
| Sony IMX455 / IMX410 / IMX366 | 1x |
| Sony IMX571 | 1.53x |
| Sony IMX294 | 1.87x |
| Panasonic MN34230 | 1.96x |
| Sony IMX432 | 2.46x |
| Sony IMX533 | 2.71x |
| Sony IMX183 | 2.73x |
| Sony IMX585 / IMX485 | 3.35x |
| Sony IMX 676 | 4.31x |
| Sony IMX662 / IMX462 | 6.76x |